Tip of the Week: Repotting Orchids—The Prep Work
Posted in Gardening Tips on March 15 2010, by Sonia Uyterhoeven
 |
Sonia Uyterhoeven is Gardener for Public Education. For hands-on demonstrations and orchid tips, join her in the Conservatory’s GreenSchool every Saturday and Sunday at 2 p.m. throughout The Orchid Show. |
Part 2 of 3-part series
Read Part 1
Last week I blogged about making just one of the many types of potting mixes for orchids. But more prep work is needed before actual repotting takes place.
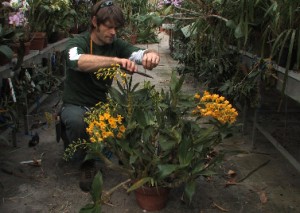
 My colleague Fintan O’Sullivan (pictured) and I we were repotting orchids in the Nolen Greenhouses for several reasons, among which were length of time since last repotting and because some had outgrown their containers.
Some of the orchids were not very large and certainly were not pot-bound, but when we looked at their labels we discovered that they had not been repotted for several years.
While the potting mix we had made would provide our tropical friends with excellent drainage and rot-resistance, over time the fir bark chips start to weather and decay. The mix then starts to collapse, losing its porous nature. The decaying bark chips turn soft and damp as they start retaining water. Once the mix collapses, the roots, which require aeration and good drainage to survive, will rot.
A few other orchids had outgrown their pots and were starting to crawl over the edge in a desperate attempt to escape. For epiphytes this is not a bad thing, but we wanted to condense the plants and give them a new home.
So as not to damage or disturb their root systems, we dislodged the orchids from their pots with care by tipping them upside down over a large bin. For orchids that had attached their roots to the side of their pots, we stuck our fingers into the mix, flipped the orchid out over the top of the pot, and pulled it down over the edge. The roots release their grip with the downward motion and neatly pull away. Then we gently cleaned out the old pieces of mix from the root system. To do this, simply stick your fingers (or chopsticks) into the tangle and loosen and free what you can. Another easy way is to take your orchid to a sink and run water through its root system.
After this process, it was time for use to inspect the roots. We kept roots that were nice and firm and pruned out those that were soft and frayed (indicating they were dead). We also removed top growth that looked old and tired as well as pseudobulbs (the swollen modified stems that store water and nutrients) that had completely collapsed.
With old toothbrushes Fintan had on hand, we rubbed some of the older pseudobulbs, removing old sheaths from the orchids. The sheaths (the modified leaves wrapped around the base) are there to protect the newly forming pseudobulbs. As the pseudobulbs develop, the sheath dries out. It is perfectly acceptable to leave old sheaths on the plant to give the orchid added character.
For those of you who have large orchid collections or pest problems, however, the sheath should be removed because it is a perfect hiding place for scale or mealybugs. Repotting is a great time to groom your orchid by inspecting every nook and cranny for pests. An old toothbrush turns out to be a perfect implement for rubbing away unwanted pests such as scale. It is gentle enough to not bruise or damage the orchid, yet tough enough to let lurking pests know you mean business.
It is important to use clean and sterilized tools during the grooming process so as not to transfer viruses from one plant to another—especially since sometimes you can’t even tell if a plant is infected. We sterilize our pruners (using a propane torch for a few seconds) every time we start to work on a new orchid.
Now that I’ve covered the groundwork, next week I’ll talk about the actual act of repotting orchids.

