Festive Seasonal Arrangements
Posted in Around the Garden, Gardening Tips on November 8 2011, by Sonia Uyterhoeven
 Last week we spoke about the art of growing giant pumpkins. Now, we will take a look at some of the creative things that you can do with your pumpkins once they have been pulled from the vine.
The chef will recommend pumpkin pie, pumpkin soup, or a slice of pumpkin bread washed down with a pumpkin latte. The entertainer and the homemaker have another option, though–pumpkins crafted into splendid temporary vases. Every year I do a demonstration on festive seasonal floral arrangements intended to give visitors to The New York Botanical Garden some simple and fun home craft ideas, a few of which I have detailed here.
Personally, there are two types of pumpkin that I enjoy working with. One is a ghostly white pumpkin named Curcurbita maxima ‘Lumina.’ It is striking when carved, and makes delicious pumpkin soup as well. My other favorite is the Long Island Cheese pumpkin, Curcurbita moschata. It is an heirloom pumpkin that has tan skin, pronounced ribbing, and a flattened, round shape that is reminiscent of–you guessed it–a wheel of cheese. It is a good pumpkin for pumpkin pie.
When carving pumpkins, always find a sharp knife that you feel comfortable handling. I also have a favorite spoon that I use to scoop out the seeds and pulp. Make sure to scrape the inside of the pumpkin clean–it will have less of a pumpkin smell and will last longer.
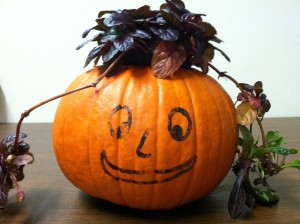
The simplest pumpkin arrangement is a fun activity for kids. Carve a three- to four-inch square opening in the top of the pumpkin, scoop out the insides, and then insert a square planting pot to fit snugly within. Then use a marker to draw up whatever funny face comes to mind. The plant spilling out of the top of the pumpkin looks like hair. One year I used a lush, vase-shaped fern as the hair piece. This year I found a pretty purple bugleweed (Ajuga) that trails down the side. Small, fountain-shaped ornamental grasses Carex comans ‘Frosted Curls’ make a graceful hairdo, as well.

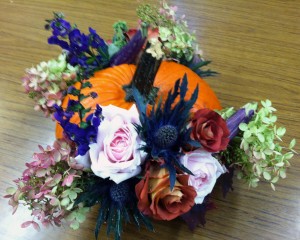
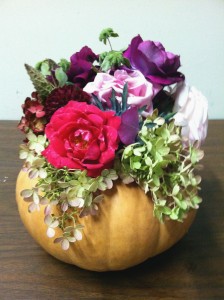
For a more adult presentation–one step up in terms of sophistication and skill–carve a four-inch square opening in the top of your pumpkin and insert the same four-inch square pot inside it. Then fill the vase with a piece of saturated floral foam and create an interesting centerpiece arrangement.
My favorite seasonal flowers and combinations for this type of arrangement are hydrangeas, dahlias, roses, and dwarf seasonal fruit, along with vegetables such as young striped ‘Fairy Tale’ eggplant, tiny Lady apples, and petite Seckel pears. I also include a selection of foliage plants such as the deep purple leaves of the cherry plum, Prunus cerasifera ‘Newport,’ or the brilliant leaves of the red maple, Acer rubrum ‘October Glory.’
A variation on this theme is a floral pumpkin basket. Take masking tape and circle it around the diameter of the pumpkin–approximately halfway down. Then take two strips of masking tape and place one on each side of the stem running down to the circling tape. You can then carve out the area surrounded by the tape; your end result will look like a basket. The space in between the two vertical strips of tape will look like a handle and the bottom half of the pumpkin will form the base of the basket. You can then peel off the masking tape, scoop out the pumpkin’s pulp, and insert two blocks of saturated florist foam inside the empty cavities. Fill the result with flowers to create a festive display.
 When cutting flowers for floral foam arrangements, I generally cut the stem to about four inches long and make the cut at a 45-degree angle. For roses, I sometimes take my pruners or a sharp knife and lightly shave down part of the stem to a 45-degree angle to increase the surface area of the cut stem.
Place the flowers carefully in the floral foam once ready. You do not want to insert flowers into the foam and then readjust them, otherwise you will create holes and air pockets in your foam base. I generally design by starting with the bottom of the arrangement, allowing foliage or cascading flowers to spill effortlessly over the side.
I first work with foliage and larger flowers, creating the foundation of the arrangement and then building on it by adding decorative layers. Many patterns, colors, and flower forms are repeated throughout the centerpiece to give it a cohesive feel. Just try to keep in mind that odd numbers tend to be more pleasing to the eye than even. I also enjoy adding curiosity pieces that grab your attention, such as miniature eggplants or unusual flowers like the striking blue sea holly (Eryngium).
Once you have tried it, I think you will be surprised by how many combinations work for fall floral centerpieces. And if you are already in the habit of creating them, leave a comment and tell us your favorite flowers for seasonal floral arrangements.

