Inside The New York Botanical Garden
Gardening Tips
Posted in Gardening Tips on June 15 2009, by Sonia Uyterhoeven
Advice and Trivia about Roses
 |
Sonia Uyterhoeven is Gardener for Public Education. Join her each weekend for home gardening demonstrations on a variety of topics in the Home Gardening Center and for part of June in the Rose Garden. |
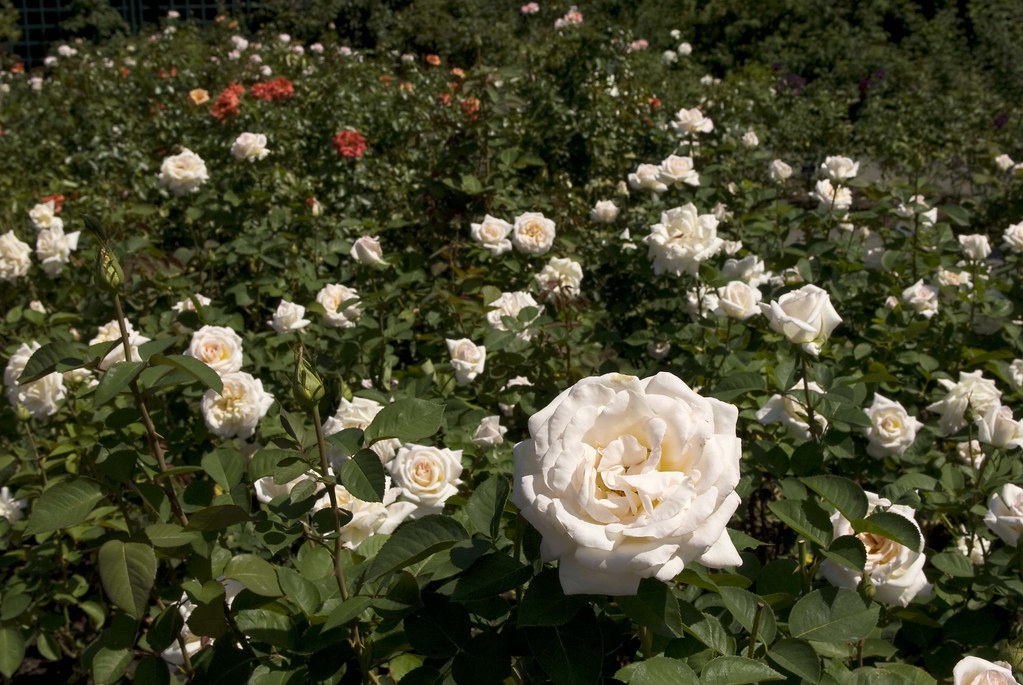 When I was a child, I used to chant “Ring-a-round the roses, pocket full of posies, ashes, ashes, we all fall down.” Recently I discovered that the traditional manifestation of this song went as follows: Ring-a-ring o’roses, a pocket full of posies; atishoo, atishoo, we all fall down. The words are rumored to have originated during the Great Plague in London around 1664. The ring of roses was a red rash that formed on the skin of infected people. Posies were an herbal mixture that people carried around in their pockets to ward off the plague, and the sneezing and falling down referred to the victims’ collapse and imminent death.
On a more cheery note, roses have long been the symbol of love, virtue, and fidelity. They have worked their way into famous passages of poetry and have enveloped religious icons in works of art.
Now is the season when the Peggy Rockefeller Rose Garden is in its full glory. The old-fashioned garden roses bloom just once a season—and June is their month. Repeat-flowering roses appear and many continue to bloom with great vigor through the entire summer.
Tips for Growing Roses
- Roses like well-drained soil and full sun
- For partial shade, try hybrid musks, albas, rugosas, ‘Knock Out’ roses, and some of the David Austin shrub roses.
- Roses are heavy feeders: Fertilize with a balanced slow-release fertilizer in April, end of June, and early August.
- Water your roses well. If they dry out, they will be more susceptible to diseases.
- Deadhead repeat blooming roses for better flowering, but leave some roses (such as rugosas) alone so that rose hips can form (not all of them form good hips).
- Prune old-fashioned roses after flowering; prune repeat-flowering roses in mid-March
A Recipe for Potpourri
4 cups dried rose petals (red and pink roses generally have the strongest scents)
1 cup dried rosebuds
1 cup dried lavender flowers
1/2 cup powdered orris root
1 tablespoon cinnamon
1 tablespoon nutmeg
1/2 tablespoon ground cloves
A few drops of essential rose oil
Place ingredients in a paper bag and store in a cool place for six weeks, shaking the contents periodically.
Check out the YouTube video by the Associated Press of Sonia identifying the best plants to use in creating a window box.
Posted in Gardening Tips on June 8 2009, by Sonia Uyterhoeven
Reaching New Heights: Tropical Vines
 |
Sonia Uyterhoeven is Gardener for Public Education. Join her each weekend for home gardening demonstrations on a variety of topics in the Home Gardening Center. |
 Vines are an important part of any tropical display. Many of them are fast-growing and can be grown successfully as annuals. Others should be overwintered in a sunny location in the home and moved outside in late spring.
Vines have different ways of climbing. Understanding how they hold onto and climb over structures will help you choose the right type of support. Mandevilla vines (Mandevilla) have twinning stems that wrap themselves around their structure; passionflowers (Passiflora) possess stem tendrils that hook onto and tighten around their support; while cup and saucer vines (Cobaea) have leaf petioles that wrap around their support.
Another important consideration when deciding on trellising for vines is to understand the ultimate size, height, and spread. Some vines such as hyacinth beans (Dolichos) are vigorous growers while others such as cypress vines (Ipomoea quamoclit) are well-behaved accent points. Sometimes information on size reflects their growth habit in warmer climates so that you can expect them to vary (be smaller) in northern climes.
The black-eyed Susan vine (Thunbergia), morning glories (Ipomoea), cup and saucer vine, Spanish flag (Mina), and hyacinth bean are all fast-growing annuals. Start them indoors from seed 3–6 weeks before the last frost date. Grow in 4-inch pots with an 18-inch bamboo stake to provide initial support. Do not start them too early; otherwise you will end up with a tangled mess.
Read More
Posted in Gardening Tips, Shop/Book Reviews on June 4 2009, by Plant Talk
 |
Richard Pickett is Director of Retail Operations. |
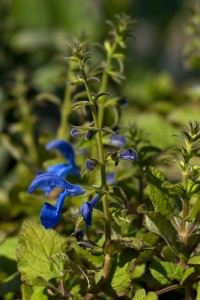 Salvia has been seducing gardeners for centuries. Roman scientist and historian Pliny the Elder was the first to use the Latin name Salvia. The name derives from salvare, to heal and save, and salvus, meaning uninjured or whole. But for today’s avid gardeners salvias, or sages as they are commonly known, are not only used for their culinary and medicinal properties but for their vibrant flowers and easy cultivation in almost any climate.
At the Botanical Garden, you can see several species of Salvia by visiting the Perennial Garden, the Rock Garden, and the Home Gardening Center. The Family Garden has planted a number of varieties as well, including one with dark violet flowers, Salvia ‘Indigo Spires’, and bog sage, Salvia ‘Ulginosa’. And, of course, Martha Stewart used plenty of Salvia in her recent redesign of the historic Herb Garden. You can even download a site plan of Martha Stewart’s Culinary Herb Garden, which will be a feature of The Edible Garden celebration this summer.
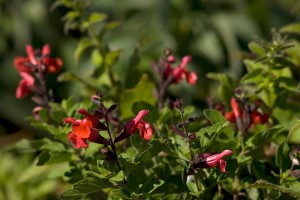 If you’re inspired to include salvias in your own garden, be it urban or suburban, you’ll find a wide variety of both perennial and annual salvias in Shop in the Garden, from Salvia officinalis, culinary sage, to Salvia nemorosa, perennial meadow sage, and the unusual annual, black-flowered Salvia discolor.
The genus Salvia has arguably the truest blues and brightest reds of any group of plants and their applications are endless—borders, baskets, herb gardens, and patio pots to name a few. There is room in any garden, terrace, or patio for a Salvia or two. They are deer-resistant, relatively drought tolerant, and attractive to hummingbirds and butterflies. What more could a gardener ask?
Posted in Gardening Tips on June 1 2009, by Sonia Uyterhoeven
A Caribbean Cocktail: Tropical Plants in the Home Garden
 |
Sonia Uyterhoeven is Gardener for Public Education. Join her each weekend for home gardening demonstrations on a variety of topics in the Home Gardening Center. |
 Tropical plants make wonderful specimen plants for a container or a welcome and exotic addition to your perennial border. Cannas and bananas are two of the most popular candidates. Both thrive when placed in sunny conditions away from the wind. Many of the variegated cannas such as Canna ‘Stuttgart’ do best when given some afternoon shade.
Cannas can either be grown as annuals or overwintered indoors. Once the frost cuts back the cannas, the rhizomes can be dug up and stored in slightly damp peat moss or in vermiculite in a cool, dark area for the following year. Banana should be potted up and also stored in a dark, cool area (below 55° F). The plants go dormant but should not dry out completely (check moisture levels once a month). Move them outside once it warms up or transition them slowly on an enclosed porch or greenhouse in spring.
There are many other tropical plants on the market these days that will set your garden on fire. Hibiscus ‘Maple Sugar’, as the name suggests, has dark maroon maple-like foliage. It complements cannas nicely and its deep tones add striking contrast to any combination.
Some other dark foliage favorites include Persian shield (Strobilanthes), purple spiderwort (Tradescantia), and Joseph’s coat (Alternanthera). Persian shield can handle drought, deer, and rabbits. Its foliage presents a glowing combination of purple, silver, and green, making it a vibrant addition to any perennial garden. To create a sophisticated color echo in your border, pair it with silver foliage such as dusty miller (Senecio), wormwood (Artemisia), or plectranthus (Plectranthus). If the foliage is getting too ungainly just pinch it back to create a more compact specimen.
Read More
Posted in Gardening Tips on May 26 2009, by Sonia Uyterhoeven
It’s Time for the Chelsea Chop
 |
Sonia Uyterhoeven is Gardener for Public Education at The New York Botanical Garden. Join her each weekend for home gardening demonstrations on a variety of topics in the Home Gardening Center. |
For those of you who grow sweet peas from seed, you will know from experience that once the seedlings reach 4–6 inches tall, you need to pinch them back to approximately half their height to encourage good branching. Some people pinch just once, other pinch twice— like most things in gardening, method is often based on personal preference.
If pinching seedlings with your fingertips sounds too dainty, then just wait until late May or early June, the time to grab your sheers or pruners and try them out in the garden on a larger and more satisfying scale…but not on your sweet peas, please.
In England they call cutting back perennials the “Chelsea Chop.” This is because the time for cutting back perennials lands on the same week of the famous Chelsea Flower show (the third week of May). Cutting back some (not all) perennials early in the season encourages lateral growth and produces nice and bushy (if not slightly shorter) plants.
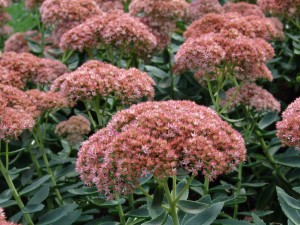
What are some candidates for this treatment?
Sedums (Sedum), pictured: Chop them in half in late May and you will prevent them from opening up and falling over later in the season.
Montauk daisies (Nipponanthemum): They often relish being chopped twice in the season, which keeps them from splitting open once they are in bloom.
Asters (Aster) and chrysanthemums (Chrysanthemum): If you are meticulous and have just a few, you can pinch them by hand by taking your thumb and forefinger and pinching off the growing tip of the plant (generally a half inch to 2 inches from the top). Let the plant grow a couple weeks until it puts on 2 or 3 nodes and then pinch again. For those of you who are as impatient as I am, just chop them in half once and then walk away.
Read More
Posted in Gardening Tips on May 18 2009, by Sonia Uyterhoeven
How to Water Newly Planted Trees
 |
Sonia Uyterhoeven is Gardener for Public Education at The New York Botanical Garden. Join her each weekend for home gardening demonstrations on a variety of topics in the Home Gardening Center. |
Newly planted trees are thirsty for water. On the day of planting, give them a deep soaking; then come back the next day and soak them again. The ground around the root ball of the tree will take up most of the water from the first day, and the second watering ensures that the root ball gets soaked.
If you walk around The New York Botanical Garden, you will notice that around newly planted shrubs and trees is a small berm of soil (part of the backfill). What we have done, basically, is to build a saucer around the woody plant that will help retain water.
The saucer should be the size of the root ball. When water is added to this makeshift well, it penetrates into the root ball (and hence the roots) rather than seeping into the disturbed soil around the plant. The berm should be broken down after several months and certainly by the end of the growing season. Distribute the soil away from the tree so that you do not alter the soil level around the root ball
The easiest way for a homeowner to water a newly planted tree or shrub is to lay a hose at the base of the tree and run a slow trickle of water for several hours until the soil is thoroughly soaked. It is better to water your tree once a week with a deep soak than to water it frequently for a short time (which produces a shallow, weak root system).
For additional tips on watering newly planted trees…
Read More
Posted in Gardening Tips on May 11 2009, by Sonia Uyterhoeven
Lovely Lilacs for the Garden
 |
Sonia Uyterhoeven is Gardener for Public Education at The New York Botanical Garden. Join her each weekend for home gardening demonstrations on a variety of topics in the Home Gardening Center. |
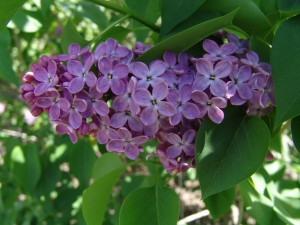 Lilacs have been a staple of the home garden for hundreds of years. They flourished and were coveted by founding fathers such as Thomas Jefferson and George Washington. The popularity of lilacs comes as no surprise—they are easy to grow, wonderfully fragrant, and produce beautiful, blousy flowers from late April into June (depending on the cultivar).
The common lilac (Syringa vulgaris) is also known as the French hybrids from important hybridizing work that was undertaken in France in the 19th and 20th centuries. This lilac, indigenous to Eastern Europe, is the image we conjure up when we think of lilacs. It has elegant heart-shaped leaves and large, fragrant flowers, typically in white or purple. Another common lilac is the early flowering hyacinth lilac (Syringa x hyacinthiflora). This is a cross between the common lilac and an Asian species. It flowers up to 10 days earlier. It looks very similar to the common lilac and has fragrant single or double flowers.
Tree lilacs (Syringa reticulata) are wonderful disease- and pest-resistant plants. These large lilacs can easily grow up to 20 feet tall. They have creamy white flowers that appear in June and lovely ornamental bark.
Meyer or ‘Palibin’ lilacs (Syringa meyeri) and the Manchurian lilac (Syringa patula) are two dwarf varieties that make excellent garden additions to beds and borders and are often used as screens or hedges. Their height ranges from 4 to 8 feet, and they produce pale mauve flowers in late May to early June. The popular cultivar ‘Miss Kim’ (Syringa patula ‘Miss Kim’) is one of the few lilacs that have a wonderful fall color—a deep burgundy.
For tips about growing lilacs…
Read More
Posted in Gardening Tips, NYBG in the News on May 4 2009, by Sonia Uyterhoeven
Going Native: Azaleas for Everyone
 |
Sonia Uyterhoeven is Gardener for Public Education. Join her each weekend for home gardening demonstrations on a variety of topics in the Home Gardening Center. |
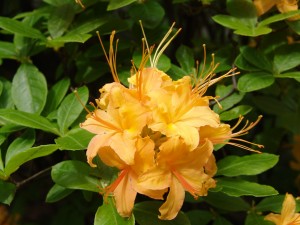 Spring is a season of anticipation and joy. Cheerful bulbs emerge from the ground and cover the landscape with color. Flowering trees and shrubs follow suit in one of the year’s most magnificent displays. As the season unfolds, everything takes its turn providing a symphony of color—magnolias, flowering cherries, azaleas, redbuds, lilacs, and crabapples.
One of my favorite players is the native azalea. It is a versatile plant that is often overlooked by the homeowner. Native azaleas are known for their spectacular bloom in spring. Many are incredibly fragrant, often with a spicy clove scent. A number of them also provide a wonderful show in the fall, with leaves ranging from yellow and burnt orange to fiery red.
Native azaleas have a graceful form that adds height and structure to any woodland garden. Most native azaleas grow from 5 to 8 feet tall, with some of them stretching to 10 feet at maturity. They rarely need any pruning, just an occasional thinning out of congested branches or removal of dead wood. Prune immediately after flowering.
To learn more about native azaleas…
Read More
Posted in Gardening Tips on April 27 2009, by Sonia Uyterhoeven
Woolly Adelgid
 Sonia Uyterhoeven is Gardener for Public Education at The New York Botanical Garden.
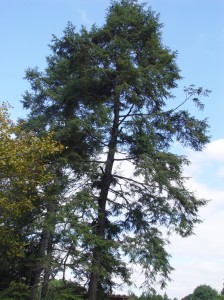 Who’s afraid of the hemlock woolly adelgid? Certainly, many gardeners in the Northeast. Like many pests that plague us, these little creatures were introduced from abroad. In their homeland (Japan) they are kept in check by a type of ladybug that is a natural predator. Here in the United States, though, the woolly adelgid has free range. The only natural challenge it faces is extreme temperatures—once the thermometer drops below 23°F or -5°C, the mortality rate of these fluffy little critters rises.
So what is hemlock woolly adelgid and why should we be concerned? This pest spends most of its life protected under its telltale fluffy white secretion. You probably have seen it cover the branches of hemlocks. It plants itself at the base of the needles and slowly sucks the sap—and life—out of a tree. This can take anywhere from 1 to 15 years, depending on the tree and environmental situations. While many pests target unhealthy and, therefore, susceptible trees, this pest prefers healthy ones.
For those of you who have grown up on the East coast, as I have, you will appreciate the importance of the Eastern hemlock (Tsuga canadensis) in the landscape. For the homeowner, it is one of the few conifers that make an outstanding addition to a shady border. It has delicate foliage, it can withstand hard pruning, and its lower branches often reach down to the ground, creating a nice, full specimen. It is an important screening and landscape plant.
What you may not have thought about is the important role that it plays in the ecosystem. This shade-tolerant tree grows slowly into giants in the forest, creating cool, shaded areas by stream and river beds that allow many fish and aquatic invertebrates to thrive.
To learn what you can do to help your hemlocks fight the woolly adelgid…
Read More
Posted in Gardening Tips on April 20 2009, by Sonia Uyterhoeven
Caring for Mother Earth
 Sonia Uyterhoeven is Gardener for Public Education at The New York Botanical Garden.
This week we commemorate Earth Day. Celebrate the life on this planet yourself by spending time in your garden. Forget the heavy chemicals and fertilizers. Sometimes they do have their place, but more often than not a healthy, well-maintained garden is all you need.
Here are some ways to help the planet.
- Make your own compost. With compost you will be essentially giving your garden all the nutrients it needs. Compost is basically a mix of “browns” and “greens.” Browns are lifeless, carbon-rich materials such as autumn leaves, straw, and wood chips. Greens are fresh, nitrogen-rich materials such as weeds and grass clippings. Pile up your compost so the mound is able to retain heat and moisture, allowing the composting organisms (the critters and microorganisms that break down the material) to thrive. Never place weed seeds in the pile unless you know how to heat up the pile to kill them off, otherwise you may inadvertently end up spreading them in compost around your garden. To speed up the composting process, chop the material into small pieces. Turn the pile occasionally and add water if you are going through a long, dry spell. Never introduce meat scrapes or vegetable oils into the pile; otherwise you will attract unwanted pests.
- Add aged manure to your garden. Apply it particularly around roses and in your vegetable garden to give plants a nutritional boost. You can buy either bagged manure or farm manure. If it is straight from the farm, it needs to break down for at least 3-6 months before you can safely add it to your garden. If you buy farm manure in the spring, just keep it in a pile and apply it at the end of the fall season. Many people incorporate manure into their compost to create a hearty mix.
- Use organic fertilizers. These are better for the plants and for the environment. Don’t be put off by the low numbers on the organic fertilizers—these represent the percentage of nutrients that are initially available to the plant. There are more nutrients in reserve that are bound and will slowly be released, providing a moderate and constant flow of nutrients. Inorganic fertilizers that have high numbers give the plant an abrupt blast and then it goes through withdrawal; you have created a plant junkie that suffers from a feast-or-famine syndrome. Consistency is always best for your little green friends. Take a look at the ingredients to see what is in your fertilizer: seaweed and kelp provide great micronutrients; green sand is rich in potassium; phosphate rock has good mineral content; compost and dried whey are popular organic materials.
To learn more about how you can help the planet…
Read More

 When I was a child, I used to chant “Ring-a-round the roses, pocket full of posies, ashes, ashes, we all fall down.” Recently I discovered that the traditional manifestation of this song went as follows: Ring-a-ring o’roses, a pocket full of posies; atishoo, atishoo, we all fall down. The words are rumored to have originated during the Great Plague in London around 1664. The ring of roses was a red rash that formed on the skin of infected people. Posies were an herbal mixture that people carried around in their pockets to ward off the plague, and the sneezing and falling down referred to the victims’ collapse and imminent death.


 Lilacs have been a staple of the home garden for hundreds of years. They flourished and were coveted by founding fathers such as Thomas Jefferson and George Washington. The popularity of lilacs comes as no surprise
 Spring is a season of anticipation and joy. Cheerful bulbs emerge from the ground and cover the landscape with color. Flowering trees and shrubs follow suit in one of the year’s most magnificent displays. As the season unfolds, everything takes its turn providing a symphony of color
 Who’s afraid of the hemlock woolly adelgid? Certainly, many gardeners in the Northeast. Like many pests that plague us, these little creatures were introduced from abroad. In their homeland (Japan) they are kept in check by a type of ladybug that is a natural predator. Here in the United States, though, the woolly adelgid has free range. The only natural challenge it faces is extreme temperatures—once the thermometer drops below 23°F or -5°C, the mortality rate of these fluffy little critters rises.