Inside The New York Botanical Garden
Gardening Tips
Posted in Gardening Tips on April 13 2009, by Sonia Uyterhoeven
Fragrant Daffodils
 Sonia Uyterhoeven is Gardener for Public Education at The New York Botanical Garden.
 Daffodils are a harbinger of spring. They brighten up the dreary days starting in March and run through to the end of May. While they are immortalized for their cheery colors—traditionally pure yellows, now increasingly in white with orange, pink, and even green trimmings—some of these spring glories are fragrant.
The fragrance can range from peppery to citrus. The large-cupped daffodil named ‘Fragrant Rose’ as suggested has a nice rose smell. ‘Sir Winston Churchill’, a nice double, has a citrus fragrance.
Jonquilla, Tazetta, and Poeticus daffodils—divisions 7, 8, and 9 (daffodil classification is based on shape and size of the flower; the American Daffodil Society identifies 13 divisions)—tend to be the most fragrant. Among their ranks are: ‘Intrigue’, ‘Fruit Cup’ ‘Pipit’, ‘Stratosphere’, ‘Geranium’, ‘Hoopoe’, ‘Falconet’ and ‘Actaea’.
The choice is much wider and there are daffodils in other divisions that are also known for their scent: the doubles such as ‘Cheerfulness’ and ‘Yellow Cheerfulness’ in division 4; the large-cupped daffodils in division 2, boasting ‘Charlton’, ‘Sweet Charity’, and ‘Louise de Coligny’; and the pure white ‘Thalia’ from the Triandrus daffodils in division 5.
Come visit the Garden and stroll down the Daylily/Daffodil walk by the Visitor Cafe to find your favorite. We also have a beautiful display on Daffodil Hill and another collection, the Murray Liasson Narcissus Collection, behind the Watson Education Building heading toward the Magnolia Collection.
Posted in Gardening Tips on April 6 2009, by Sonia Uyterhoeven
Planting Peas
 Sonia Uyterhoeven is Gardener for Public Education at The New York Botanical Garden.
Successful gardening is about being in sync with nature. Plant your peas on St. Patrick’s Day is the old adage that has been passed down to gardeners in the tri-state area. While this works for some, I have often found the ground to be too soggy and wait until April 1.
We add compost and aged manure into the beds in the fall so that we are all ready to go in the spring. Remember to mulch your peas with straw before the weather gets too hot, or alternatively, shade their roots with lettuce to keep them cool; the cool, moist soil helps to lengthen the harvest.
Fresh peas are as sweet as candy. Harvest the peas before they get too old, otherwise they will become starchy. Look for swelling pods where the peas are just starting to fill up but before the pod is completely full. Hold the plant with one hand and gently pull off the peas. Once the peas mature, it behooves you to harvest daily.
Early in the season is not only the time to grow shelling peas but also snow peas and snap peas with their edible pods. Once you have harvested your peas, you can replant the area with the pole beans that will fill the space and provide you with another delectable harvest.
Remember that all legumes are great team players in the garden; they are experts at capturing atmospheric nitrogen and storing it in their roots. This nitrogen will eventually be released into the soil for other plants to use.
Peas love to grow on trellises. Last year we experimented with several different kinds. For one pea we used pea stakes. In England, they generally coppice birch or hazel to get pliable stems with a good branching structure. I didn’t have that available so I tried the long stems of my butterfly bush (Buddleja) that I cut back every April. The stems were more brittle than I would have liked, but they worked well and provided the support the peas needed.
Another support that I use in the garden is the arbors that decorate the raised beds. The peas climb up the sides of wire cloth wrapping their tendrils around the wire framework and hoisting themselves up to the top. This system always works well as it gives the peas plenty of light, air circulation, and space to grow.
I also tried some wonderfully decorative trellises purchased from a Vermont-based catalog company called Gardener’s Supply Company. They were inexpensive and elegant. My favorites for the peas were the expandable willow trellises. They scampered up the sides only to be replaced mid-season with morning glories (Ipomoea), bitter melons (Momordica), and a host of other summer vines.
Some nice pea varieties to try are ‘Mr. Big’, ‘Maxigolt’, ‘Amish Snap’ (snap pea), ‘Sugar Snap’ (snap pea), ‘Oregon Giant’ (snow pea), and a delightful dwarf cultivar called ‘Tom Thumb’.
This year I am dabbling with some colorful heirloom varieties. ‘Golden Sweet’ has two-toned purple flowers and lemon-yellow pods. It is an edible podded pea that is excellent for stir frying. ‘Blue Podded Shelling’ is another stunner that is used in soups. Both of these heirlooms reach 5-6 feet in height and will need good trellising
Included in the mix is ‘Green Arrow’, a reliable English variety that reaches 2-2.5 feet tall. I am growing this shelling pea, a heavy producer, to add some flavor to my pasta dishes this spring. This is a great variety for hungry homeowners with limited growing space.
Posted in Gardening Tips on March 30 2009, by Sonia Uyterhoeven
Pruning Roses
 Sonia Uyterhoeven is Gardener for Public Education at The New York Botanical Garden.
 Common sense and experience tell us that a stitch in time saves nine. The same principle applies to pruning: A knick in time saves nine. This being the case, when is the best time to prune your roses? Traditionally, we go out and prune the roses when the forsythia starts to bloom. The reality is that you can go out anytime during late winter and early spring to cut back your repeat-blooming roses.
With springtime pruning, you are trying to conserve the plant’s energy. Watch your roses (or for that matter your Buddleja, Caryopteris, Hydrangea paniculata and whatever else you are planning to hack back), and wait until the buds begin to swell. This signals the initiation of growth and that it is a good time to jump in with the pruner’s saw. Do not wait until new branches begin to emerge, otherwise you will just end up cutting off new growth that has expended valuable energy—and it will go wasted.
Before you begin, remember these important rules:
- Always cut out dead, damaged, and diseased wood first.
- Remove any crossing or congested branches to enhance circulation
- Then work from there.
Modern hybrids are fairly forgiving; you can cut many all the way to the ground and they will sprout again. In general, the harder the pruning cut the more vigorous the new growth. We cut most of our hybrid teas back to 8–12 inches (depending on the rose and the winter damage). Larger shrub roses are generally cut back by one-third.
We prune the roses back to an outward facing bud. This bud generally indicates where the new growth will come from. In roses it is important to create a nice open framework, so that you want the branches to be growing in an outward, vase-like fashion. Make the cut about one-quarter inch above the bud. If you cut too close to the bud, you may end up damaging the bud. We often cut the cane at a 45-degree angle facing away from the bud so that it will encourage rainwater to run off away from the new growth.
Remember that these rules only apply to repeat-blooming roses. Old-fashion roses that flower once per season are pruned immediately following flowering. These roses flower on old wood. If you prune them early in the season, you will be removing the flowers for the season. Old-fashioned roses have congested canes removed after flowering, and they are shaped and often cut back by one-third.
Don’t be afraid to prune your roses; they are fairly forgiving. Experiment to see what works best in your garden, and enjoy the learning process.
Posted in Gardening Tips, Learning Experiences on March 23 2009, by Sonia Uyterhoeven
Larger than Life Space Savers: Growing Miniature Orchids in the Home
 Sonia Uyterhoeven is Gardener for Public Education at The New York Botanical Garden.
 If you have been visiting the Garden over the past few weeks and enjoying The Orchid Show, once you get into Shop in the Garden to “do some damage” you will be surrounded by many sweet smelling and wonderful hybrids that stretch upward to 4 feet and beyond with wonderful exotic sprays of flowers (Brassia, Oncidium, Ondontoglossum, and more).
If you don’t have space in your home for these gorgeous giants, there are many attractive miniature alternatives that are ideal for orchid growers of different experience levels, from beginner to advance.
We always think that bigger is better, but often in the confined quarters of our homes this is not the case. When you are thinking of growing plants on a windowsill or table, a diminutive-size plant not only does a better job of fitting the space but ends up creating a greater impact. Here are a few suggestions.
For several years now, the clone or cultivar Oncidium ‘Twinkle’ has been all the rage. To tell you that it is fragrant is an understatement. It exudes a strong, spicy vanilla fragrance that fills the air. This small orchid grows to about 12 inches tall with a full spray of white flowers. It is a cross between Oncidium cheirophorum and Oncidium ornithorynchum. There are a number of clones on the market, Oncidium ‘Twinkle Sharry Baby’ looks and smells like its larger parent (a scent of chocolate) but only reaches 6 inches tall.
Like other “dancing ladies,” these little orchids do well in medium to high levels of light. They will thrive in a southern or western exposure as long as the temperatures do not get too warm or the air too dry. One common mistake that people make with these orchids is overwatering. Miniature orchids grow in smaller pots that dry out faster and often need more frequent watering than orchids in larger pots. Remember, however, that many of the same rules apply. Oncidium like to approach dryness between watering; ‘Twinkle’, with its tiny roots, is no exception.
Encyclia have big, round pseudobulbs (swollen stems that hold water), which tells you right away that this orchid likes to get dry in between watering. This is an ideal orchid for the beginner who has bright light. Encyclia like intermediate to warm temperatures (average household temperatures) and are more forgiving of low humidity levels in the home.
Dendrochilum is a cool-looking orchid—the tiny flowers run down the spike to form a chain. This attribute is augmented by a sweet fragrance. They do well in a 3- to 6-inch pot with a fine fir bark mix or sphagnum moss. Water when the mix starts to dry and fertilize lightly on a regular basis. This orchid is happy with household temperatures and moderately bright light.
Cochleanthes and Masdevallia are good small choices for the more experienced orchid grower. Cochleanthes amazonica thrive in low levels of light (eastern or bright northern exposure) and intermediate temperatures. This orchid likes high levels of humidity (up to 70 percent), so it might be a good candidate for the aquarium or an enclosed case. The reward is a big flower on a small plant.
Masdevallia is known for its intoxicating, colorful blooms. It demands a relatively cool and humid environment to survive. These orchids do not posses a storage system, so they should not dry out. New Zealand sphagnum moss makes an excellent choice for potting media. A regular feed of a diluted fertilizer will keep this orchid healthy and flowering.
Posted in Gardening Tips on March 16 2009, by Sonia Uyterhoeven
Good Husbandry
 Sonia Uyterhoeven is Gardener for Public Education at The New York Botanical Garden.
While good husbandry is an essential quality for any man, it is equally important for your plants. Now, what exactly is good husbandry some of you may be asking? For the former, I will wisely defer. As far as your plants are concerned, however, good husbandry essentially means good breeding practices. It is about selecting desirable qualities.
While I was in England last summer visiting the legendary garden Great Dixter, plantsman and designer Fergus Garrett spoke a great deal about good husbandry. It is important to do a little bit of research before you purchase a plant. Fergus pointed out that in some cases when you are choosing certain cultivars (cultivated varieties) you are making the choice between plants that will flower for 4 months versus 3 weeks.
Geranium ‘Johnson’s Blue’ is a good geranium and a former award winner, but it has now been superseded by the long-flowering Geranium ‘Rozanne’. In England a popular geranium is the longstanding Geranium ‘Ann Folkard’. A new addition to the market these days is Geranium ‘Ann Thompson’, whose magenta flowers last longer and are equally glorious.
It is not only about finding plants that flower well. There are other attributes to consider when choosing cultivars such as growth habit, the ability to form good seed heads and berries.
In terms of his selection of dahlias, Fergus looks for cultivars with a good, strong branch structure. He likes dahlias where he can simply stake the main stem and then secure strong lateral branches to the framework. Some of the favorite dahlias at Great Dixter are Dahlia ‘David Howard’, D. ‘Wittemans Superba’, and D. ‘Hillcrest Royal’.
If you are at a loss for choosing good cultivars for your garden and are searching for perennials that will not only perform well throughout the summer with their flowers but will also fade with dignity, form good seed heads, and maintain an attractive appearance, then come visit the Botanical Garden’s Seasonal Walk.
This year we had the famous Dutch designer Piet Oudolf team up with the Dutch bulb designer Jacqueline van der Kloet to create our seasonal display. This border will be full of many of Oudolf’s own introductions from his nursery in Hummelo, the Netherlands. It will include Echinacea ‘Fatal Attraction’, E. ‘Green Jewel’, and E. ‘Vintage Wine’ as well as Salvia ‘Eveline’.
Along with these Dutch introductions are stalwarts in our own nursery trade such as Astilbe ‘Visions in Pink’, Actaea ‘Brunette’, Helenium ‘Moerheim Beauty’, and many more. Bring your notepad and pencil and enjoy a stroll down Seasonal Walk for a wonderful educational experience. The bulbs will start the show early in the season and the perennials and ornamental grasses will take over during the course of the summer and close out the show in the fall.
Posted in Gardening Tips on March 9 2009, by Sonia Uyterhoeven
Sowing Seeds Indoors
 Sonia Uyterhoeven is Gardener for Public Education at The New York Botanical Garden.
There are a number of advantages to starting your seeds indoors, among which is getting a jump on the growing season weeks before the last frost date (May 15 in New York City). Some vegetables take a long time to mature, and early sowing assures a good crop.
Starting from seed offers you a much wider selection than what you would find in already grown plants in a gardening center. Often, the more unusual and cherished varieties are only available in seed, and over the past decade, many more interesting ones, especially heirlooms, have become available.
I have many friends who like to trial heirloom tomatoes. Starting them from seed is easy and gives you more choices than you can possibly make in one season. Thumbing through the Seed Savers Exchange catalog is a great way to kindle your enthusiasm. I am personally interested in starting a basil trial and have been perusing Seeds of Change and Johnny’s Selected Seeds catalogs for inspiration.
These days, many seed companies are catering to our desire to “try a little bit of everything.” Besides the popular mesclun mix, companies now offer a variety of seed mixes such as “gourmet beet blend” and “gaggle of gourds,” which include a tasty and colorful assortment of heirlooms. Botanical Interests, Inc. is one such company that has a delightful selection of seeds.
Starting from seed is an incredibly cost efficient way to grow a large variety of herbs, flowers, and vegetables. The price of a seed packet is just a fraction of the cost of store-bought plants. Finally, it is simply rewarding to plant seeds and to watch them grow. Passionate gardeners and good cooks wait with anticipation as their summer harvest begins its seasonal cycle.
Sonia tells how to best sow seeds indoors, after the jump.
Read More
Posted in Gardening Tips on March 6 2009, by Plant Talk
Help for the Home Gardener
 Carol Capobianco is Editorial Content Manager at The New York Botanical Garden.
Spring is just around the corner. Will you be ready when it arrives? Are your gardening plans taking shape? There’s no need to face the daunting task alone: Take advantage of the Garden’s expert resources for plant information and gardening advice.
- Spend tomorrow, March 7, learning about spring preparation—fine-tuning your soil, starting plants from seed, pruning, and more—during an all-day immersion, Spring Fever Saturday. This is just one of the many fabulous Continuing Education classes and workshops offered throughout the year.
- Attend one or all of the onsite demonstrations (free with Garden admission) offered each week in the Home Gardening Center.
- Explore the wealth of ideas, recommendations, and guidance offered on our Home Gardening Online Web pages.
- Refer to our Monthly Gardening Calendar to learn which garden chores to tend to each month.
- Search through the top seasonal plant picks in our Recommended Plants database.
- E-mail the Garden’s Plant Information Specialists with specific gardening questions such as when to prune your trees and shrubs, and which species to choose for a hedge.
- Read the many tips and how-to information presented such as how to keep deer away, downsize your lawn, or attract butterflies.
- Stroll the grounds and soak up inspiration from the 50 gardens and living collections. Or, if you’re looking for historical information and a warm place on a cold day to read about gardens and dream, peruse the infinite collection of botanical books in the unrivaled LuEsther T. Mertz Library.
- Beef up your own home gardening library with a visit to Shop in the Garden, in person or online, which recently was called “the most intelligently run shop for garden books in America,” by the Financial Times of London.
- Include the kids. The Ruth Rea Howell Family Garden opens for spring in a few weeks with new display gardens, plant varieties, programs and more.
- And don’t forget. You can always chat with other gardeners right here on Plant Talk and on our companion blog, Green Perspectives: Tom Christopher on Sustainable Gardening.
Check out all of Saturday’s programming.
Check out all of Sunday’s programming.
Posted in Gardening Tips on March 2 2009, by Sonia Uyterhoeven
Steaming Things Up: Growing Orchids in the Home
 Sonia Uyterhoeven is Gardener for Public Education at The New York Botanical Garden.
 One of the challenges of growing orchids in the home is maintaining reasonably high humidity levels.
A drywell, while not the most effective antidote, is a common solution and one of the easiest for many houseplants. Creating one is as simple as filling a tray with a layer of pebbles and water and placing the orchid on top, making sure that the pot rests above the surface of the water. The water from the drywell will evaporate around the plants. Placing an oscillating fan so that it gently blows are over the surface will increase the evaporation.
Better yet is investing in a humidifier. The humidity levels in your home will drop down to 15–25 percent in winter; a good humidifier can raise that back up to 40 percent. This higher humidity level is good not only for orchids, but probably for your wintertime dry skin and the furniture as well. Of the many wonderful books on orchids, one of my personal favorites is William Cullina’s Understanding Orchids, which has an informative chapter on different types of humidifiers.
Some orchids, however, are more demanding and require levels of humidity that are unrealistic for most homeowners. Occasionally, I hear of people who successfully grow epiphytic orchids in slatted cedar baskets that dangle beneath a skylight in their bathroom. If you have the room and the inclination to shower with your orchids, then this is fine; but for most of us, that is not a viable option.
One solution is to begin collecting miniature orchids and grow them in an old aquarium. A friend of mine grows orchids this way and fits about four or five miniature orchids in a 15-gallon tank. Fill the aquarium with 2 inches of clean pebbles and add water to just beneath the top layer of pebbles. You are essentially creating an enclosed drywell for the plants.
Circulation is an important consideration for healthy orchids, so it is best to leave the top of the aquarium open. While this growing system increases the humidity, the enclosed case can overheat in the sun, so it is important to monitor the growing conditions.
Once all the variables are in place, you have an opportunity to experiment with growing a delightful array of miniature orchids. To create a display of different heights, turn over an empty terra-cotta pot and use it as a stand for your orchids. To learn more about this setup and for an accessible, no nonsense approach to growing orchids, refer to Ellen Zachos’ book Orchid Growing for Wimps.
Posted in Exhibitions, Gardening Tips, The Orchid Show on February 23 2009, by Sonia Uyterhoeven
Everything You Need to Care for Orchids Is in Cupboard
 Sonia Uyterhoeven is Gardener for Public Education at The New York Botanical Garden.
 The best way to avoid or eliminate pest and disease problems when growing orchids in your home is to follow good cultural practices. Correct watering routines, consistent fertilizing, a good growing medium, proper light requirements, and adequate humidity levels are all essential to getting your exotic friends to thrive.
Sometimes, all that we do to take care of our orchids just isn’t enough. Let’s take a look as some user-friendly products that we have on hand to treat an ailing orchid. The first on the list is a grapefruit. If you notice that something is munching holes in the leaves of your orchid, but you just can’t find the culprit, then it’s probably a slug.
They nestle into the nice loose and moist pieces of your fir bark potting mix and wait until dark before they strike. These nocturnal creatures can do quite a bit of damage, so leave an overturned grapefruit or citrus rind in your pot. The slugs will crawl up into the damp cavity and you can then toss it out (slug and grapefruit rind) in the morning.
For other pest problems such as aphids, mealybugs, and scale try reaching into a household cupboard and pulling out the rubbing alcohol or the Murphy’s Oil Soap®. Dilute the Murphy’s Oil Soap® by adding 2–3 tablespoons to a quart of water. For scale, take a soft toothbrush or a cotton swab soaked with rubbing alcohol and rub off the scale.
Any new treatment should be tried first on one leaf or an isolated part of the plant to see how it is going to respond. Spray early in the morning or late in the day. Some sprays dry off quickly in the middle of the day and lose their potency and other times the combination of the spray and the intensity of the midday sun can burn the leaves. You will miss some insects the first time you spray, so repeat the treatment once a week for several weeks.
 If your orchids have black or brown spots that start to grow and look watery or mushy, then there is a good chance that it has a bacterial or fungal problem. Stick your hand back into the cupboard and grab the cinnamon—nature’s favorite natural fungicide. If possible, cut off the infected portion of leaf and sprinkle cinnamon over the area. If that is not available try Neosporin® applied with a cotton swab.
Posted in Gardening Tips on February 17 2009, by Sonia Uyterhoeven
The Cutting Edge
 Sonia Uyterhoeven is Gardener for Public Education at The New York Botanical Garden.
It’s the time of the year to get outside and evaluate the pruning needs in your yard. February and March tend to be ideal times to prune, not all but many of your shrubs.
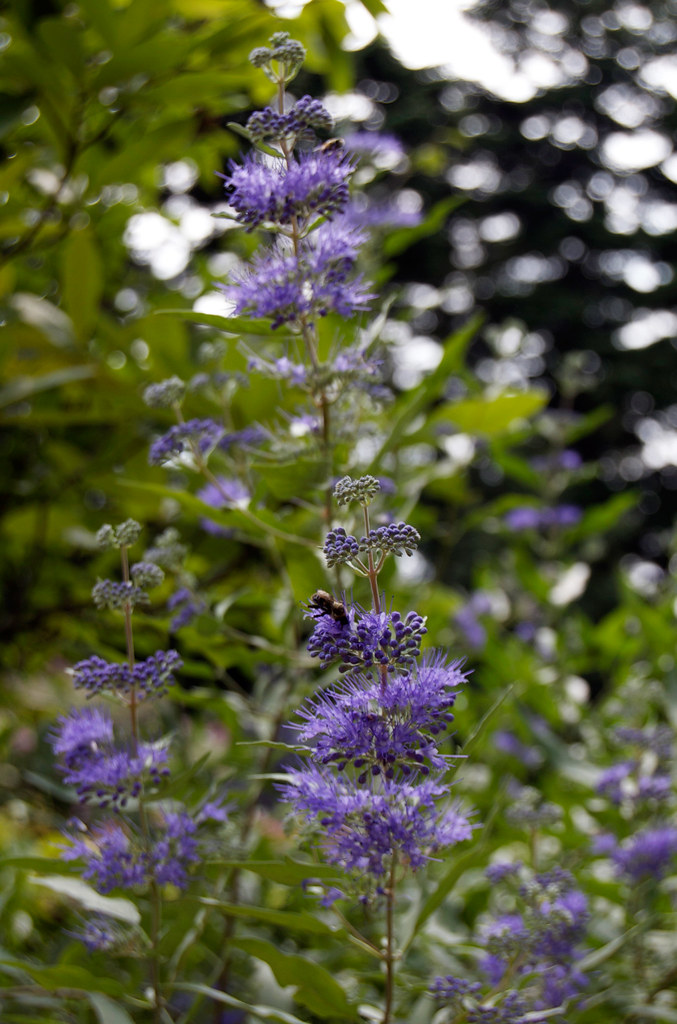 How do you go about deciding what needs to be done? First of all, it is important that you get to know your plants. Some shrubs respond well when pruned back hard every year in winter to early spring. They produce vigorous new growth and more flowers. Classic examples are repeat-flowering roses (e.g. hybrid teas), butterfly bush (Buddleja), and blue mist shrub (Caryopteris), pictured at right.
Some shrubs such as Japanese andromeda (Pieris), rhododendrons (Rhododendron), and Carolina allspice (Calycanthus) need very little pruning. Other shrubs such as daphne (Daphne) resent pruning and will tell you.
Gardening often involves casualties, and this is just part of the process. Here are some basic guidelines for pruning shrubs and several tips to get you successfully through the season.
Start your pruning by cutting out all dead, damaged, and diseased branches. Then stand back and look at the shrub. Second, remove any branches that are crossing over, deciding which branches to remove and which ones should remain. Step back again and look at the shape that you are left with. You will be amazed at how little pruning you have to do on the majority of your shrubs once you have made these cuts.
Remember that a shrub is like a crowded subway. As long as everyone has their own personal space and enough room to breath, they are happy. Your woody plants are the same. Do not have branches competing for the same space, they will only be unhappy. New wood is more vigorous than old wood, but it is good to have a balance between both so that you have some character and structure along with the young new maverick branches (that tend to be more floriferous). Once you have grasped these concepts, pruning is then a matter of style and personal taste.
Additional tips:
- Never remove more than 20 percent of the growth unless you are rejuvenating a plant.
- Always use sharp, clean tools that are appropriate for the task.
- Shrubs that flower on current season’s growth can be pruned early in the season.
- Shrubs that flower early in the season or flower on old wood (last season’s growth) should be pruned immediately after flowering. Remember that there are always exceptions to the rule, and it is important to know your plant.
- Work with the natural shape of the plant to enhance its natural beauty and structure. This is very important. Working with the plant rather than against it will save you a lot of work.
- Error on the side of caution—if you are not sure about a cut, don’t do it.
Like every other aspect of gardening, have fun, make plenty of mistakes, and learn.
 Sonia Uyterhoeven is Gardener for Public Education at The New York Botanical Garden.
  Daffodils are a harbinger of spring. They brighten up the dreary days starting in March and run through to the end of May. While they are immortalized for their cheery colors—traditionally pure yellows, now increasingly in white with orange, pink, and even green trimmings—some of these spring glories are fragrant.


 If your orchids have black or brown spots that start to grow and look watery or mushy, then there is a good chance that it has a bacterial or fungal problem. Stick your hand back into the cupboard and grab the cinnamon—nature’s favorite natural fungicide. If possible, cut off the infected portion of leaf and sprinkle cinnamon over the area. If that is not available try Neosporin® applied with a cotton swab.