The best pruning jobs begin with a goal, a determination of what needs to be accomplished–reducing size, controlling shape, rejuvenating growth. As with all pruning jobs, removing the dead and diseased wood is the first call of order. Then take a step back and look at the framework before moving ahead with your mission.
The best time to prune azaleas and rhododendrons is immediately after bloom into mid-July. If you wait too long, buds will already have formed for the following year. In general, azaleas and rhododendrons need minimal pruning.
Reducing Size
To reduce the height of an azalea while allowing it to retain its natural appearance, follow the branch targeted for removal down to a lower lateral branch, and make a cut just above the point of intersection. The cut should be slightly above where the two branches intersect so as not to cut into the tissue of the branch that will remain.
Another way of reducing the size of an azalea is to cut it back to just above a whorls of leaves. Also look for circular scars around the stem, where leaves once were. Cutting just above these areas should create good bud break. In either case, make the cut just above new buds, whether they are visible or latent.
Controlling Shape
Evergreen azaleas can be sheared back to form nice mounds if desired. If you are pruning the azalea into a mound, remember to occasionally open up the plant and let some light penetrate into the dense mass of foliage so that it doesn’t get too congested.
If you’d like to make a young azalea or rhododendron more compact and well-branched, the easiest thing to do is to pinch off the vegetative buds in spring. First take a look at the plant to familiarize yourself with the bud system. The fat swollen buds are flower buds. These form in the previous season and overwinter, and you’ll want to leave these alone. They are generally twice the size of the vegetative buds, which are the narrower, pencil-like, smaller buds.
The majority of azaleas native to North America hail from the states running down the Appalachian mountain range; from Maine to Florida. All of the North American natives are deciduous, tend to have open, loosely branched habits, are known for their hardiness, and for their exquisite fall foliage. Many are scented, with perfumes ranging from sweet to spicy.
Though azaleas in general prefer part sun and moist, humus-rich, well-drained soil, among species there is a broad spectrum of tolerance for heat, moisture, and hardiness. Flowering times are also wide ranging: from early April into August.
Following are some native species and their cultivars that can be found in the Azalea Garden.
As discussed last week, good site conditions such as a soil pH of between 4.5 and 6, soil rich in organic matter, good drainage, and a part-shade to full-sun environment including protection from strong winds are essential for the health of azaleas. Be sure to research basic information about the azaleas you are purchasing including color and bloom time, its ultimate size, growth habit, and hardiness When planting azaleas, it is important to provide enough space between them for sufficient light and air circulation. Plant labels and catalogs generally supply appropriate spacing information for both the height and width of the azalea.
Chances are that the azaleas you purchase will have been grown in a container, either in a soil-less potting medium or a mixture of composted bark and sand. While these are fine mediums for plants grown in a container, making them easier to care for, the potting mediums are very different in structure from native soil, and water will not flow freely from one to the other. Often, the native soil around the newly planted azalea will be moist while the root ball remains dry. Because of this, the day before planting, water your potted azaleas so that they are well hydrated but not too soggy.
If you have good drainage, plant your azaleas at the same level to the soil as they were in the container. The planting holes should be the same depth as the container and 3-5 times as wide, with sloping sides. Most of the roots on each azalea will be growing in the top 12 inches of the soil, extending outward rather than downward. The goal in making a wide hole is to loosen the soil in the area of maximum root growth. Remember, azaleas are a shallow rooting plant. Do not dig the hole excessively deep, otherwise the root ball will sink and settle too low. If you have clay soil, you can plant your azaleas slightly higher than grade (1 to 2 inches higher). Sometimes azaleas are planted 6 inches higher with great success. To do this, add coarse sand and leaf compost to the backfill and grade on a slight slope.
When removing an azalea from its container, take care to protect the tiny hair-like feeder roots along the main roots, which can be torn if the plant is pulled from its base straight from the container. Instead, for a small container, with one hand cup the top of the container around the stem. Tip the container upside down–cradling the plant with the cupped hand–and slide it out of the container. If the root ball sticks to the container, tap it against a firm surface to dislodge the plant from the pot. For a large container, two people may be needed to hold and tip the container or to lay it on its side and gently slide the plant out.
Azaleas are wonderful additions to the garden. They are easy to grow, look sensational, and have attractive foliage. Evergreen azaleas provide year-round interest while deciduous azaleas often have exquisite fall color and exhibit an elegant woody framework in winter.
In their native habitats, azaleas are often found growing in or on the edge of woodlands in well-drained, acidic soil that is rich in organic matter. They have a shallow, fibrous root system, which needs to be considered when caring for them. Azaleas do well in full sun or part shade (about four hours of sun). Planted in full sun, azaleas will be more compact and floriferous. When planted in part shade, they will stretch toward the sunlight and form a more graceful habit; flowers will not be as plentiful but will last longer.
When using azaleas for foundation plantings, locate them 3 – 4 feet from the building so that the roof will not obstruct rainfall and so that air can circulate around the plants. Avoid planting near highly reflective walls unless on the north side of the building or in the shade. Windy sites are problematic: in winter, winds and sun can desiccate the foliage, of evergreen azaleas especially. Deciduous azaleas are more forgiving.
Azaleas need good soil structure and plenty of organic matter so that their shallow roots will not dry out. Conversely, azaleas can be suffocated by excess water and poor drainage; soil compaction around foundations and in yards is a frequent problem. When amending the soil, it is better to prepare the entire bed rather than just the planting hole to create a uniform condition so that the fibrous roots are encouraged to spread. As a general rule, the soil should contain 5 – 10% organic matter.
Azaleas, as seen in the Garden‘s spectacular new Azalea Garden, provide home gardeners with wonderful spring color that extends from April into July (depending on the species). Evergreen azaleas provide year-round interest while deciduous azaleas often offer multi-seasonal appeal and lovely fall foliage. Azaleas are slow growing; many of them, save some of the larger deciduous natives, make good candidates for foundation plantings. By following a few simple rules, it is easy to design effectively with azaleas.
Azaleas can be planted as specimens or in groups. The royal azalea (Rhododendron schlippenbachii) not only has luminescent pinkish-white flowers in late April/early May but also exquisite rounded foliage that is arranged like pinwheels on the stems, making it an ideal specimen plant.
The native flame azalea (Rhododendron calendulaceum) flowers in late May to early June in a variety of shades from fiery red-orange to yellow-orange (as the name would suggest). Specimens can reach up to 12 feet tall and 5 feet wide and rival any large Viburnum in the garden. When planted en masse, flame azaleas create a nuanced color harmony that will brighten any landscape; they do not look congested or dense due to their graceful structure. Though deciduous, they can provide seasonal screening in your yard.
Pay attention to bloom time when planting azaleas in groups. Azaleas can generally be categorized by three bloom times: early, mid, or late season. I have visited gardens where azaleas are effectively planted so that they flower sequentially; as one azalea fades its neighbor opens, providing color for extended periods. Or, weave a tapestry by planting groups of azaleas that flower at the same time.
The show–which opens tomorrow, April 20–features artists from 14 States and 8 countries. There are 43 works on botanical specimens that have economic importance whether they are used in medicine, food, clothing and shelter.
The works range from paw paws and pomegranates to pokeweed. In anticipation of the opening I would like to take a look at one of the entries: Ginger (Zingiber officinale). Ginger is a spice that carries me through the winter months; I add it to my salmon dishes for flavor and drink cupfuls of ginger tea to ward off sore throats and soothe my stomach. In my youth, consumption was centered on ginger ale and ginger bread cookies.
The tan knobby fresh ginger you buy in the supermarket is a creeping, underground modified stem. Botanically speaking, the part we harvest and use is called a rhizome. Ginger is a 3-4 foot tall perennial with an almost bamboo-like appearance. It sends shoots or leaf stalks that have alternating leaves arranged on the same plane up from the rhizome.
Ginger is an old spice with a long history. It is indigenous to Asia from India to China. It has been used for centuries in Ayurvedic Indian and Chinese medicine. The Greeks and Romans used it to perfume their baths and viewed it as an aphrodisiac. Roman statesmen who felt their lives were threatened were rumored to drink herbal concoctions with ginger, cinnamon, frankincense, and myrrh to build up a tolerance to poison.
Ginger was an import commodity that was transported via the Silk Road from the East to the West. It was traded for livestock, silver, and gold. The distinctive flavor and odor of ginger come from three volatile oils gingeroles, zingerone and shogaols.
In medicine it is used for muscle pains, sore throats, as digestive aid, and to fight fatigue. These days you can find it in the cosmetic industry in bath salts and scented candles. The grocery store has it candied, preserved, dried, and fresh. The list of culinary uses are endless.
For a fun activity you can try and grow this tropical plant at home. Buy fresh ginger from the grocery store. Choose a well-branched piece that has lateral (side) buds. The buds will look like tiny horns. Plant it half in potting soil and half out and water carefully. Roots will form from the rhizome and the ginger will start to grow. Grow outside in the summer but remember to bring it indoors once the weather starts to cool.
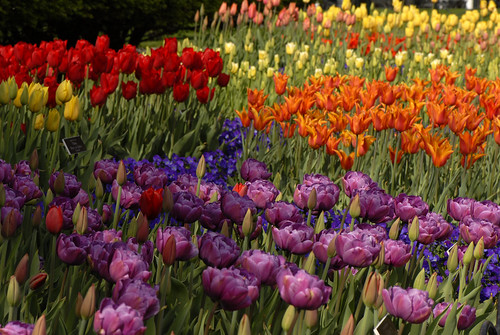
The tulip has been immortalized for centuries in many ways. Recently it was celebrated as a symbol of beauty and intrigue in Michael Pollan’s Botany of Desire. Pollan chronicles the history of a flower that has seduce people throughout time and through its beauty has lead them to exalt; to speculate and squander; to make careers out of hybridizing – searching for the latest sensation in color, form and beauty. These efforts have brought the tulip from the obscurity of high mountain ranges in central Asia into the world market.
Like many bulbs, tulips are planted in the fall. They are neatly tucked 6-8 inches in the ground in areas with good drainage and full sun. The bulbs put out roots in the fall and then sit there waiting until the snow melts and the temperatures in the spring warms before they shoot up and flower early in the spring.
Now is the season to start thinking about doing your window shopping – going around to different gardens and parks to see what the myriad of colorful cultivars from bulb catalogs look like in person.
As you admire these cheerful harbingers of spring take a look at their form, their height, their color. Stick your nose close to the blossom – some are fragrant – many are not. Many tulips change their color as they age. Many change their color with the light and have a translucent quality to them.
Tulips generally only last for a few years in the New York climate and are generally used as annuals. They are often used in large springtime annual displays – planted en masse in the fall and ripped out in the spring – ending up in the compost pile.
Many homeowners do not want to devote an entire area in their garden to a labor intensive display. Rather, they would like to incorporate them into their pre-existing perennials borders and foundation plantings. Last fall we had two experts from Holland come over and discuss bulbs that performed well for a number of years and were good candidates for perennial plantings.
Some of the tulips that were recommended by the International Flower Bulb Centre were:
‘Ad Rem’, ‘Ballade’, ‘Ballerina’, ‘Cape Cod’, ‘Couleur Cardinal’, ‘Flaming Purissima’, ‘Golden Apeldoorn’, ‘Maureen’, ‘Menton’, ‘Negrita’, ‘Parade’, ‘Peer Gynt’, ‘Queen of the Night’, ‘Shirley’ ‘Showwinner’, ‘Spring Green’, ‘Spring Song’, ‘Toronto’, ‘Tres Chic’, ‘West Point’ and ‘White Triumphator’. There are many more tulips that perennialize well and experimentation is always encouraged.
So how long do they last in your garden? Well, in ideal conditions in Holland many of these tulips were thriving 10-15 years later. In the New York area I would not set my hopes so high and would plan for 4 to 7 years before you are planting some new bulbs.
Some tips for helping your tulips to keep coming back every spring is to fertilize them early in the spring with either a slow-release fertilizer or organic matter such as aged cow manure just as the leaves start to poke up above the ground. Plant them in areas with good drainage and plant them slightly deeper than normal – around 8 inches deep. Once the blooms have faded remember to deadhead your flowers by snapping off the seed head. The more foliage that you leave on the more the plant will be able to photosynthesize pouring energy into the bulb for next year’s flower.
Some good perennial companions for tulips are lady’s mantle (Alchemilla mollis), hardy geraniums (Geranium), blue star (Amsonia), phlox (Phlox paniculata), bugleweed (Ajuga), Siberian bugloss (Brunnera), avens (Geum), and bugbane (Actaea).
Whether we are aware of it or not, we all eat it. It spices up our cocktail sauce, adds pizzazz to our Bloody Mary’s, seasons our roast beef, camouflages the slippery fishy taste of raw oysters and is served as an herb at the Passover Seder. For me, it is a key ingredient in my meatloaf recipe.
How many of us grow horseradish? It is one of the easiest things to grow in the garden. It will take full sun or part shade and tolerate basically any type of soil. In fact, it will be so comfortable growing in your garden it will be hard to get rid of it. Preparation will be more of a challenge. If you tear while chopping onions, open all your kitchen windows and prepare for a flood while grating the horseradish root.
60% of the world’s supply of horseradish is grown by German immigrants in Illinois on the banks of the Mississippi river. The soil in this area is ideal for horseradish – it is nice fertile soil that is high in potash. The area has long summers and cold winters. Optimal conditions mean healthier, large roots that are easy to harvest.
Horseradish roots easily break off and the pieces will grow into new plants. It is best to put it in the corner of your garden where it is out of the way and make sure you place it where you want to keep it. Horseradish or Armoracia rusticana is in the Brassicaceae family. It is related to cabbage and kale.
Its foliage looks like a hybrid between sorrel and kale and the root – the edible part of the plant – is reminiscent of parsnip. The best time to plant horseradish is in the spring. Harvesting will either happen late in the fall or sometime in the following year. Horseradish is a perennial herb and once the root is harvested – the crown of the plant and a small portion of the root can be successfully replanted.
You don’t have to pay much attention to your horseradish but it will be happier if you water it during dry spells and give it a layer of mulch to suppress weeds and retain moisture. Make sure that you do not fertilize it with a high nitrogen fertilizer that will push leaf growth at the expense of the roots.
Horseradish gets its smell and intense flavor from volatile oils that are released when it is grated. Harvest the root and chop off what you intend to use for several weeks. The rest of the root will store whole for several months in your refrigerator.
The easiest way to prepare it is pare the outer layer with a potato peeler. Chop into cubes and place in a blender. Start to blend and add some water and vinegar to the mix. The vinegar in the mix stabilizes the flavor of the horseradish. If you would like a milder preparation add the vinegar sooner than later. If you like it hot, then grind for about 3 minutes before adding. It will store in the refrigerator for a month and for much longer in the freezer.
If you are in Illinois in June then go to Collinsville on June 4-5 to experience the International Horseradish Festival. If you can’t make it there are plenty of good recipes on the web.
We eat different parts of plants. Some of the roots that we eat in vegetable gardens are carrots and radishes. Some of the leaves that we eat are lettuce and kale. Fruits are cucumbers and tomatoes. And stems….
In mid summer if you walk by a vegetable garden and see a patch of tall airy fern-like sprays of foliage and can’t put your finger on what it is – then it is simply a matter of timing.
You will recognize this vegetable in the spring as the shoots emerge from the ground before they grow to their full size. What is it? – Asparagus (Asparagus officinalis). By mid summer they have branched out beyond recognition and have an enormous amount of ornamental appeal.
Asparagus is a perennial (zone 2 to 8) that will last up to 15 years or longer in your garden. Make sure that the soil is properly amended with plenty of organic matter before you plant your asparagus since it will be there for a while.
Asparagus prefers full sun although it can handle part shade. Good drainage and rich soil is essential. It grows best in a pH between 6.5 and 7 but will handle a pH down to 6. If your soil is more acidic you will need to lime.
Asparagus can either be planted from seed or from 1 year old crowns (which is the norm). Plant the crowns (the area where the roots and the shoots meet on the plant) immediately so that it doesn’t dry out. If you can’t plant right away store the crowns in the refrigerator and mist occasionally.
Dig a trench for your plants on the edge of the garden where they will not shade out other vegetables – the foliage gets from 5-9 ft. tall. Plant the crowns 4 weeks before the last frost date in your area. Dig a trench 5 to 10 inches deep and generously amend with organic matter. Plant the crowns 18-24 inches apart in rows 3 feet apart.
Make a ridge in the middle of the trench and place the crowns on the ridge so that their roots spill over the edges. It will look like a row of octopuses sitting on a ridge. Cover with several inches of back fill and wait until you see growth before you continue to cover.
Asparagus is dioecious – older varieties such as ‘Mary Washington’ has male and female flowers on separate plants. The female plants expend energy producing seed and are not as productive. In the past people weeded out the female plants and kept the male. These days Rutgers University has produced all-male hybrids that are more productive. ‘Jersey Knight’, ‘Jersey Giant’ and ‘Jersey King’ are three popular varieties on the market.
The Rutgers hybrids should only be planted 5 inches deep. Older varieties are best planted 8-10 inches deep – they are less productive and run into problems if they are planted much deeper.
Do not harvest your asparagus for two years to allow them a chance to get established. During the third year you can harvest for 3-4 weeks and after that you will be able to harvest for 6-8 weeks. Harvest spears when they are about 6-10 inches long in spring.
Asparagus benefit from a good layer of straw mulch in the middle of the summer to keep weeds down and moisture in. Water during dry spell but otherwise they plants are fairly self-sufficient. Weed the bed at the end of the season and fertilize with compost or aged cow manure. Once the foliage dies back you can cut it down for the season.
The mention of genetic manipulation is often met with suspicion in the botanical world, yet if we look back into our past we will discover that it has been an important and well worn horticultural practice. Charles Darwin dove into the treasure troves of early 19th century hybridizers to help piece together his theory of evolution.
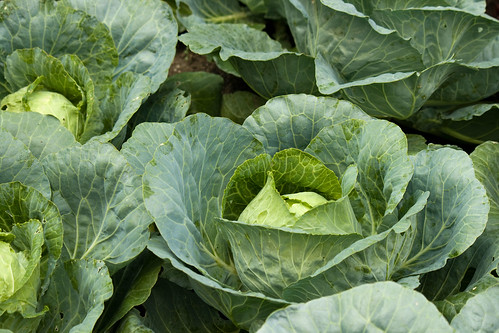
Long before then, genetic manipulation was a staple in horticultural practice. Hybridizers were constantly on the look out for specimens with desirable traits – whether it was larger fruit, early maturity or interesting foliage. Cabbage and the other members of its illustrious family have a long history of change. Some sources say these changes started back as early as the 5th century B.C.
While cabbages, cauliflower, broccoli, kale, kohlrabi and Brussels sprouts are viewed as distinct vegetables by gardeners, they all originally come from the same species – Brassica oleracea. Centuries of careful selection has lead to the variety of vegetables that end up on our table.
Wild cabbage or sea cabbage (Brassica oleracea) is a Mediterranean cliff plant that looks a lot like kale. This maritime plant is salt and lime tolerant. It is not a good competitor so it grows on hillsides. Wild cabbage is a biennial that takes 2 years to flower and set seed – the flower can reach 3-7 feet in height. The leaves that form a rosette in the first year are high in nutrients and vitamin C – ancient Greeks and the Romans relied on it as a food source.
Over time, through selection, different parts of the plant was modified and selected for. Kale was one of the first descendents. Its botanical name Brassica oleracea var. acephala means ‘cabbage without a head’. Wild cabbages with tight clusters of leaves were selected for over time and these eventually turned into heads. Our cabbage (pictured) Brassica oleracea var. capitata means ‘cabbage with a head’.
The Germans developed a taste for fleshy stems and breeding practices resulted in the ‘stem turnip’ or what we know as kohlrabi (Brassica oleracea var. caulorapa). The Italians developed a taste for immature flower buds hence the introduction of broccoli (Brassica oleracea var. italica). Brussels sprout (Brassica oleracea var. gemmifera) as you have probably figured out by now were bred by the Belgians and given the name ‘cabbage bearing gems’.
Every vegetable has a history to tell; it is our job to trace and understand it. Looking back on thousands of year of breeding certainly gives me a great appreciation for the plasticity of plant material and the amount of variation that is always present in species.


 The tan knobby fresh ginger you buy in the supermarket is a creeping, underground modified stem. Botanically speaking, the part we harvest and use is called a rhizome. Ginger is a 3-4 foot tall perennial with an almost bamboo-like appearance. It sends shoots or leaf stalks that have alternating leaves arranged on the same plane up from the rhizome.